
Interlocking polycarbonate panels install by snapping their tongue-and-groove edges together inside top and bottom aluminium tracks — there are no screws through the panel face and no visible fasteners, so the finished facade is flat, clean and seamless. A two-person crew can close a large facade area in a single day. Three rules are non-negotiable: keep the panels vertical (facades and walls only, never a roof), leave a thermal expansion gap at every panel end, and never force a panel to bend.
All of these are covered in our range — our interlocking panel range, the 2026 specifications, and the panel selection guide — so you can move from specification to ordering on one page.
How the interlocking system works
Interlocking panels are multi-chamber hollow polycarbonate boards with a tongue on one edge and a groove on the other. During installation each new panel is pressed into the panel beside it so the tongue seats inside the groove; a built-in T-clip holds the joint against a top and bottom aluminium track. Because the joint is a mechanical snap-fit, no metal connectors, glazing bars or screws touch the face of the sheet — which is exactly what gives interlocking facades their uninterrupted look.

What you need before you start
Gather the following tools and materials before beginning:
- Circular saw with a fine-tooth (plastic/PVC) blade, or a jigsaw with a fine blade
- Measuring tape, spirit level, plumb line and a drill/driver
- Interlocking panels — standard width 500 mm, thickness 10–50 mm depending on span and insulation needs
- Top and bottom aluminium tracks (U-channels) plus T-clips
- End caps, edge sealing tape and a soft cloth for final cleaning
Step-by-step installation
Step 1 — Fix the top and bottom tracks
Set the upper and lower aluminium tracks level and plumb, then fix them to the substructure. Leave enough clearance inside each track for the panel to slide in and for thermal movement, rather than wedging the sheet tight.
Step 2 — Measure and cut the panels
Cut each panel to length with a fine-tooth blade, leaving about 4 mm of clearance per metre of length for thermal expansion (roughly 15 mm total on a standard 6 m panel). Keep the protective film in place while cutting to avoid scratching the surface.
Step 3 — Insert the first panel
Slide the first panel into both tracks and seat it against the end profile. Check that it is plumb before proceeding — the first panel sets the line for every panel after it.
Step 4 — Snap the next panel into place
Present the next panel at a slight angle and press its groove onto the tongue of the installed panel until it clicks home, then seat it in the tracks. Work panel by panel across the facade; the tongue-and-groove joint pulls the faces flush with no visible fixing.
Step 5 — Continue and finish the ends
Carry on snapping panels across the run, checking plumb at regular intervals. Fix the final panel and close both vertical ends with the end profiles so the last tongue or groove is not left exposed.
Step 6 — Seal and cap the edges
Apply edge sealing tape to open ends and fit the end caps. For exterior facades, seal the top track junction so water cannot sit on the top edge of the panel.
Step 7 — Remove the protective film and clean
Strip the protective film only after all cutting and handling is finished, then wipe the surface with a soft cloth and mild soapy water. Do not use abrasive pads or solvent cleaners.
Thermal expansion allowance
Polycarbonate expands by roughly 0.065 mm per metre per °C of temperature change — far more than glass or steel. If a panel is fitted tight with no clearance it will buckle or crack as the temperature rises. The table below shows the total expansion to allow for common panel lengths and temperature swings.
| Panel length | 20°C swing | 40°C swing | 60°C swing |
| 2 m | 2.6 mm | 5.2 mm | 7.8 mm |
| 3 m | 3.9 mm | 7.8 mm | 11.7 mm |
| 6 m | 7.8 mm | 15.6 mm | 23.4 mm |
Interlocking panel specifications
| Thickness | Structure | U-value (W/m²·K) | Light transmission | Typical use |
| 10 mm | 3-wall | ~3.5 | 65–82% | Light partitions, small areas |
| 12 mm | 3–4 wall | ~3.0 | 60–80% | Storefronts |
| 16 mm | 5-wall X-braced | ~2.5 | 55–78% | Facades, pool fencing |
| 20 mm | 5-wall X-braced | ~2.0 | 50–75% | Standard curtain walls |
| 25 mm | Honeycomb multi-chamber | ~1.6 | 45–72% | Large-span facades |
| 30 mm | Honeycomb multi-chamber | ~1.3 | 40–68% | High-rise facades |
| 40 mm | Nine-chamber | ~1.0 | 30–60% | Energy-efficient facades |
| 50 mm | Extra-thick multi-chamber | ~0.71 | 20–55% | Cold-climate facades |
All panels share the same base properties: standard width 500 mm (custom 600/700/800 mm available), length 6 m standard with custom 1–12 m and up to 16.5 m on request, double-sided co-extruded UV layer of 30–50 μm, weight 2.0–8.0 kg/m², and a service range of -40°C to +120°C. Fire ratings reach B1 (GB 8624), UL94 V-2 and Euroclass B-s1,d0.
Common installation mistakes to avoid
- Using interlocking panels as a roof. The flat tongue-and-groove joint is designed for vertical facades where rainwater runs straight off. On a horizontal or low-slope roof the joint can hold water — use a U-Lock roofing system instead.
- Forcing panels to bend. Interlocking panels are flat and cannot be cold-bent around a curve. For curved roofs or canopies, choose a bendable U-Lock panel.
- Fitting panels tight with no expansion gap. This is the fastest way to buckle or crack the sheet in summer heat.
- Facing the UV-protected side inward. Confirm which face carries the UV co-extrusion and install that side outward, matching the markings on the protective film.
Where interlocking panels work best
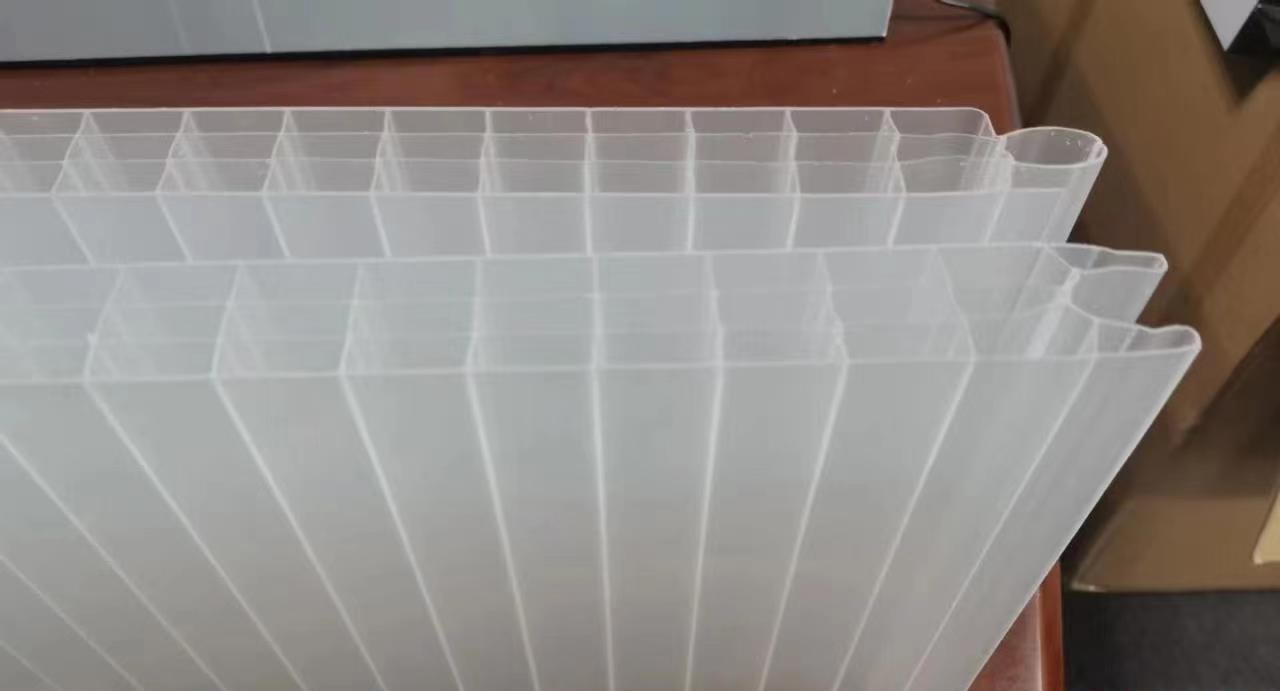
Interlocking panels are a facade and interior product. They are the right choice for office and commercial curtain walls, storefronts, backlit signs and light boxes, interior partitions, and landscape feature walls — anywhere you want a clean, uninterrupted, translucent surface. For daylight roofs, skylights, greenhouses and curved canopies, switch to a U-Lock polycarbonate roofing system instead.
Frequently asked questions
Can interlocking polycarbonate panels be used for roofing?
No. The flat tongue-and-groove joint is made for vertical facades and walls, where rainwater drains straight off. On a roof the joint can retain water and leak. For roofing, use a U-Lock polycarbonate system with its raised, interlocking ribs.
Do interlocking panels need screws or metal fasteners?
No visible fasteners are needed on the panel face. Panels snap together edge-to-edge and are held by top and bottom aluminium tracks with built-in T-clips, which is what keeps the facade surface clean and seamless.
How much expansion gap should I leave?
Allow about 4 mm of clearance per metre of panel length, split across both ends. A standard 6 m panel needs roughly 15 mm of total allowance for a 40°C temperature swing.
Can interlocking panels bend around a curve?
No. Interlocking panels are rigid and flat and cannot be cold-bent. For curved roofs, canopies or barrel vaults, choose a bendable U-Lock panel, which can be cold-bent to a minimum radius of about 3–8 m.
How do I cut interlocking polycarbonate panels?
Use a circular saw or jigsaw with a fine-tooth blade, keep the protective film on while cutting, and cut slowly to avoid melting the edges. De-burr the cut edge before snapping the panel into place.
Installing interlocking panels and need the system details?
Send us four things and we’ll come back with the sheet spec, thickness options and fixing details for your project — plus a reference project for the same application:
- What the panels are for — facade, partition, balcony, or storefront
- Panel size — width and length, or total area in m²
- Whether you need a frame system as well
- Destination country or port
Related on this site
- All Outdoor Materials — roofing, cladding, glazing, canopies